Saturday, February 26, 2011

Tortilla Soup

After buying a few whole chickens with the strict purpose of making chicken stock, I found myself with an abundance of shredded chicken.  I figured the best way to use it would be to make a white chicken chili.  While hunting for a recipe, I happened upon a link I had saved some time ago, a recipe for Tortilla Soup.

The recipe calls for 2 whole chickens and gives instructions for how to prepare them.  I made two changes immediately.

1.  I didn't follow the cooking instructions.  I already had cooked, shredded chicken on hand. 
2.  I cut the recipe in half.  I didn't want to use that much chicken up on a recipe I'd never made before.

Like most good things, the recipe starts off with a saute of onions and garlic.


Here are some of the key ingredients (see recipe): Chipotle Peppers in Adobe Sauce, canned diced tomatoes, green chiles, fresh jalapeno, black beans, and shredded chicken
The beginning of something amazing
And the key players from the spice rack:  Chili Powder (of course), bay leaves, garlic powder (this recipe calls for a ton of garlic, but I don't think you could really tell), oregano, chipotle chili powder (a new addition to my huge spice collection), and cumin.

Pre-Spice (I never seem to remember to photograph ALL the ingredients...
This also has some frozen corn (recipe calls for canned).

With Spices on top:

Look at this yummy finished product!!

Here it is with the glorious and necessary (to dull the burn!) cheddar cheese and light sour cream:
I've already had a large bowlful prior to this picture being taken

Verdict:  This was a very delicious recipe.  I portioned it out into 6-8 servings (remember, I HALVED the recipe!) and ate it for lunch and dinner for until it was gone.  I will definitely be making this recipe again.  It is super duper delicious.

Side note:  I also had some tortilla chips...I didn't crumble any of them into the soup or really even use them to dip anything except maybe once or twice.  I guess thats just a preference thing...

Thursday, February 24, 2011

Stock Pot

Bought myself a stock pot at Wally World the other day.  I had a huge stash of frozen vegetable odds and ends and wanted to get some more vegetable stock on hand.

I underestimated the amount of stock this new huge pot would generate!  I guess I didn't think about the fact that a huge pot filled to the top would have a huge yield...

Luckily, I really like making soup...
And also luckily, I had enough room in my freezer.  :)

Monday, February 21, 2011

(Not as good as my mom's) Beef Stroganoff

Each weekend I try to do my cooking for the week ahead.  I find that this sets me up for success and helps me avoid trips through drive-thru windows.  A few weeks ago I got so hungry that I found myself eating Capt'n D's.  That's not even good quality seafood.  If I'm going to spend the calories to have that kind of thing, its going to be high quality, darn it!  Recently, I had a craving for beef stroganoff.  Whatev.  I'm flexible.

I found a recipe on Epicurious.com.  You can check it out by clicking HERE.

I did a decent bit of editing to the recipe in an attempt to get the calorie count down.  The original recipe calls for whipping cream, oil, and close to an entire stick of butter.  In my attempts to slim down, I don't need to eat more then one serving of something like that...and since I wasn't planning on sharing the yield from this dish, I made some little edits.

Here are the ingredients:

There is definitely some homemade chicken noodle soup hanging out in the background there.  It's amazing and delicious.  The recipe is from one of my favorite bloggers, A Dork and His Pork.  If you want the Chicken Soup recipe, click here.  Make as written but with extra broth.l  Then add egg noodles.

Now for a close up of the ingredients:

I had to buy some beef bullion since I never use it...and have no idea how to make it either.  I was a little grossed out while shopping for it...wasn't able to really find anything that seemed to actually be made from beef...

Instead of whipping cream, I substituted whole milk from my favorite milk provider, Snowville Creamery.  It wasn't a huge amount of calorie savings, but substantial enough that I decided to use it.  I already had some brandy on hand from a pork chop recipe I made, and the whole grain mustard left over from a ham.  Then just a few spices.

Instead of using oil to brown the meat, I made up some extra beef broth and used that to keep the pan moist.  The meat just needed a quick sear on each side.  I placed a bowl on the stove to hold the meat until I was ready to add it back in.  It also collected some yummy juices that I poured in as well.  Nice extra flavor.

The pan in the back is defrosting some homemade vegetable broth for a barley soup...

Next step was to cook down the onions and mushrooms


Here they are after a little cooking:
After that, you just stir in the meat and then the milk.  And voila!

This recipe was pretty darn tasty and had depths of flavor that I wasn't used to.  After I told my mom about making this, she told me how she makes hers.  I will probably try her version next, particularly because it sounds like it will have significantly less calories and fat then my recipe.  Afterward, I will likely merge the two recipes.  :)  I wanted more gravy in mine.

Just writing this makes me want some more stroganoff.  Yummy.

Monday, February 14, 2011

Enchanted Cottage

*Warning: This is a super long blog post*

This year was the first Valentine's season in a couple years when I've had a partner to do something romantic with.  As he is currently living in Columbia, SC and I in Cincinnati, OH, we noticed that the Gatlinburg/Pigeon Forge area is about halfway between our current residences.  Around Christmas and New Years, we started planning our next get together.

I only had a few criteria:
1.  I didn't want to stay in a hotel
2.  I wanted something secluded
3.  I wanted to avoid commercial properties
4.  A hot tub would be nice

I found a home for rent in Walland, TN, which is just far enough from Gatlingburg/Pigeon Forge that you might not even bother going over there.  In fact, we were in Pigeon Forge for all of about an hour.

The place I found is appropriately called "Enchanted Cottage in the Woods."

The link above takes you to the webpage that I'm guessing was created by the folks that own the home.  I'll include two more links at the bottom.  I found the property using TripAdvisor, but it is also listed on FlipKey.

Here is what it looks like from the front:
Here is the peaceful scenery that greeted us on our first evening:
The cabin owner also left us this little treat:
You can only see one house from this little cabin.  The house is so far back from the road that you can't even see it from the foot of the driveway.  Here is the view in the morning, which shows you about how far away the closest house is (far enough).
One of my favorite things about my boyfriend is that he is the first person I've come across with a sweet tooth that rivals mine.  Between the two of us, there was not much savory food in the house!
Just for the record and to indemnify myself here...I only brought three items that are in this photo.  Just sayin.  Oh, and that glass full of candy?  That came from my V-Day Present.  :)  I'd also like to point out the Blueberry Pie, which I picked up from Bonomini Bakery in Northside.  Their pies are the best!
This is my Valentine's Day present.  :)
 So, what does one do after consuming lots of treats?  We decided we would try to burn some of them off with a hike up to the top of the mountain.  The driveway continues all the way up to the top, but you can't take your car past the house due to a gate. 

Perhaps the steep angle of this hill would have convinced us that climbing to the top was not a good idea.  However, we are both somewhat stubborn and were determined to get to the top.  My guess is that its between 1.5 and 2 miles uphill to get to the top.  It took us most of an hour, with frequent breaks as we started to get worn out and winded.  Even walking back down took about 25 minutes.  But the higher we went, the better the view got.

View from the top!
Once we got down the mountain, we started a big huge fire in the fireplace.  We wanted to make s'mores on the embers.  While he built and lit the fire, I had a little nap on the couch.  :)  It was super cozy.
While the fire was burning down to a nice s'mores level, we hopped into the hot tub to soak our sore muscles.
The tub was super cute.  The owners strung up some icicle style Christmas lights on the railing, which set a lovely atmosphere in which to have a nice glass of red wine and relax.  Of course, we couldn't stay in too long when this was waiting for us!  (See below)

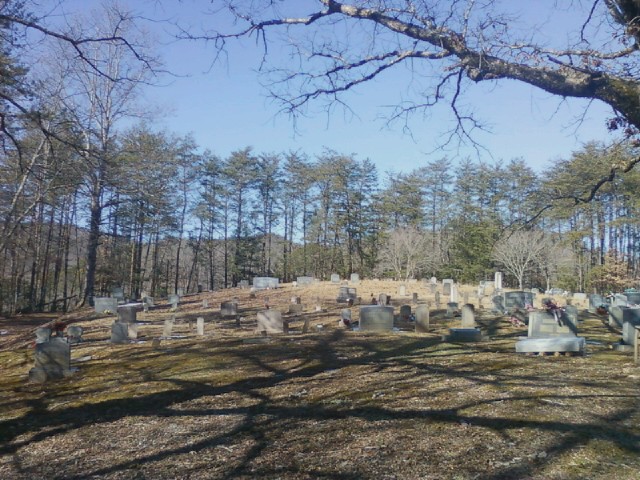
We also did a little cemetery exploring, which is weird but something we enjoy.  Isn't this a pretty spot?


Those pictures are from two different cemeteries we visited on the way back from a quick jaunt into Pigeon Forge.  One of the coolest things we saw there was hand carved grave stones.  I took a picture of one:
I'm guessing that this headstone said something other then the name initially, but maybe the elements wore off most of it.  Hard to say.  There were a lot of graves that were simply marked with a plain piece of stone sticking up from the ground.

We were both disappointed when it was time to head back to our homes.  We will definitely return here in the future.

As indicated above, here are a couple other links for more details (And pictures of the inside of the cabin):
The owner's website
Trip Advisor (Reflects current availability)
Flip Key

Wednesday, February 9, 2011

Dilled Vegetable Barley Soup from The Enchanted Broccoli Forest

It's freezing here in Cincinnati.  A large number of people I spend a lot of time with (at work, at home) have been sick with the flu or other fun stuff and I am trying my best not to get it.  I was concerned that I might fall ill with it this week, so I made sure to have some soup on hand. 

Actually, I've been trying to make 1 pot of soup a week for the past month or two.  It's gone really well.  I don't make it every week, but I have consistently been having delicious soup around to snack on.  Or take to work for lunch!

I'm also trying to use up dry goods items from my pantry because I noticed a few things were starting to age and I want to make sure I get my money's worth and eat them up!

Here is the recipe for the week, creatively hidden by a selection of the ingredients.  Mushrooms on sale?!  Yes, please.  I bought five :)

First stop was a little choppy-choppy action:
Then came a little simmering action.  Look at that nice pile of dill!
Here is the finished product!  I didn't eat any of this right away because I'd made a few other fancy dishes the same day. 
This was a flavorful soup, but I've had much better barley soup recipes and probably won't make this one again.

Sunday, February 6, 2011

Maple Cinnamon Butternut Squash

My roommates went on a cruise to the Caribbean.  I couldn't go because I just started coursework for my MBA and I didn't want to miss any of my classes.  What to do when the nights get cold and lonely?  Fire up the oven and make some comfort food!

I started off with a small butternut squash.  Using the sharpest knife in my arsenal I cut off the bottom and then shaved off the hard skin.

This was one of the easiest squashes I've ever peeled and I'm not certain why that was.

Here it is chopped up into tiny pieces.


I wasn't sure what to do with it...So I started off with some coconut oil...


Then added some pure maple syrup, and some cinnamon.  Cinnamon not pictured.


Then I put it in a very hot oven and baked it until the edges were crispy and browned.  I love the crisping effect you get when you use a little fat and a little sugar in the oven.

This was so amazing that once it came out of the oven I didn't have time to take a picture.  I just gobbled them right up.

Saturday, February 5, 2011

Homemade Energy Bars

What is that?!  My homemade energy bars of course!  I was tinkering around with the idea of making my own because I'd been spending a decent chunk on 'bars' of various sorts each week.  I liked the idea of controlling the ingredients and the size, plus taking the cost down a couple notches. 

If you google the title of this post I'm sure you will find tons of recipes.  I've made these on several occassions using various different ingredients. I was trying to use up some sunflower seeds before their expiration date, so here is the recipe I used this time-

Recipe:

6-8oz dates
1/2 small bag of dried prunes
1c sunflower seeds
1/2c Peanut Butter made with Trader Joe's Peanut Flour
1 heaping tablespoon Maca Powder
1 tablespoon Spirulina
Sprinkle of Cinnamon
1c Maple Cinnamon Butternut Squash (Link previous post)
Water as needed

Don't have one of the weird odd ball ingredients I used?  Doesn't matter.  You don't need it.  I already had spirulina and maca powder on hand because I've been using them as supplements for the last year or so.  Just mix in whatever you want until you get the texture you desire.


Dates are a little hard on the blender because they are tough little buggers.  I blended them first, then added the sunflower seeds.  I didn't want to bite into a chunk of date.
Next up is some Spirulina powder.

The benefits of Spirulina are too many to list, so if you want to learn more, visit the link above in the recipe.  As a side note, even a small bit of this concentrated powder will turn most things a deep shade of green.  :)

The picture below is prior to the Spirulina being added.  I've got the sunflower seeds and peanut butter in there.

Now comes the green color!
I had some delicious roasted butternut squash on hand and I decided it would add a nice sweet taste to my bars, so I mixed some of that in as well.

Here I am adding in the Maca Powder.  Held in one of the awesome containers I got from IKEA.
I like to blend the mixture for quite a while so there aren't any surprise chunks in the bars.

Lastly, you line a pan with some nonstick wrap, then press the mixture in.  You will want to refrigerate it for a while so its easier to cut.


When ready to cut, simply lift out of the pan!  I used a butter knife to cut these.  Oops...I ate one already.

Leave in the pan or slice and wrap individually for quick carrying.

The key to these homemade bars is the texture.  You have to have enough fluid or soft ingredients for your blender to be able to chop everything very finely, but you don't want it so mushy that you don't want to eat it.  After all, who wants a mush bar?